Files · sharing · desktop sync
ShellX Drive manual
Keep your files on a server you control. Work in the browser, share with your team or guests, and sync selected folders to Windows, macOS, or Linux.
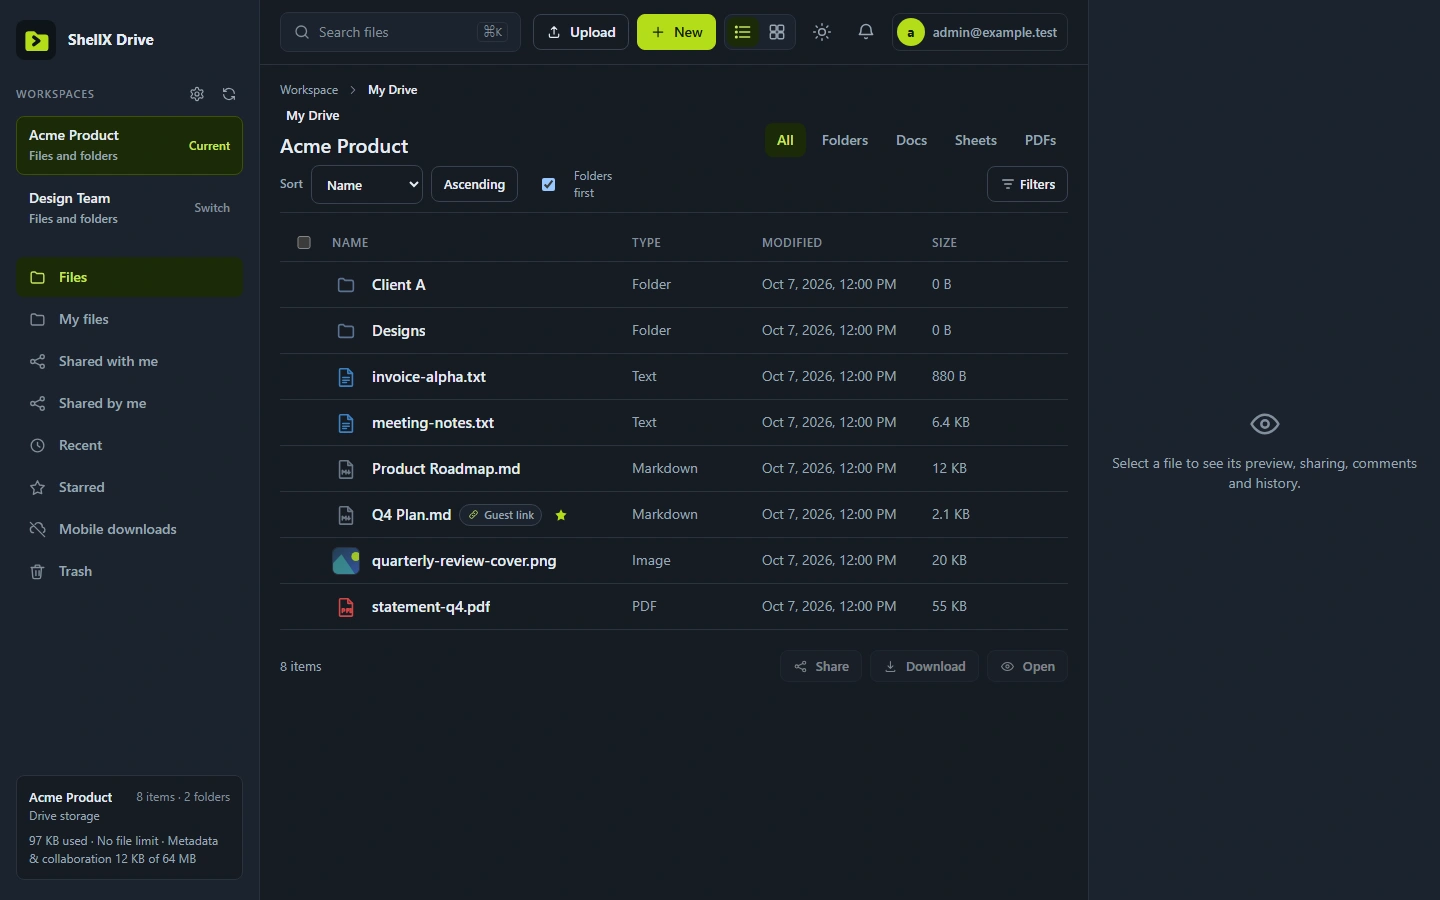
Choose your setup
If your organization already runs Drive, get its HTTPS address and an account from the server administrator. Open that address in a current browser and sign in. Install the desktop app when you want selected Drive roots available in a local folder.
To run your own Drive, install the Linux server package, connect a dedicated HTTPS hostname, and create the first administrator. The server includes its browser app and runs independently of the other ShellX products.
Choose how to store confidential content
Drive stores server-readable file bodies so it can provide previews, content search, sharing, and WebDAV. Server and host administrators can read those files and backups. Encrypt a payload locally before uploading it when its contents should stay confidential from the host, and keep its encryption keys with you.
Install a server
The release package targets a Linux x86-64 host with systemd, Bash, standard GNU tools, and a compatible runtime. Use the maintained release installer for a production server. Host compatibility follows the package’s runtime and service requirements.
- Choose a dedicated HTTPS origin. For example,
https://drive.example.com. Arrange DNS, TLS, and a host-specific route through the reverse proxy or tunnel you administer. - Check the host. Follow the preflight in the first-install guide. Existing Drive configuration, data, or a Drive listener calls for the upgrade or recovery procedure.
- Authenticate the release package. Download the server package and its published verification material. Follow the package guide to verify the checksum and publisher attestation, then extract it into the protected installation stage.
- Run the installer’s dry-run, then install. Supply your final HTTPS origin with
--public-base-url. The installer creates a private service account, protected configuration, setup token, data directory, andshellx-drive.service. - Route HTTPS to Drive. The installed service binds to
127.0.0.1:5758by default. Add the dedicated hostname to your existing proxy or tunnel and choose an upload request-body limit that fits your use. - Check the service. Confirm
shellx-drive.serviceis active, then open/healthand/readyat the public origin. A healthy installation reportsok:trueandready:true. - Create the first administrator. Retrieve the setup token using the root-only command printed by the installer. Open the HTTPS address and enter the token, administrator email, password twice, and first workspace name.
From the verified protected package stage prepared by the package guide, use your final hostname in place of the example:
sudo "$stage/root/install.sh" --dry-run \
  --public-base-url https://drive.example.com
sudo "$stage/root/install.sh" \
  --public-base-url https://drive.example.com
sudo systemctl is-active shellx-drive.service
After creating the administrator, sign out and sign back in, enable 2FA, and try an ordinary upload, preview, download, share, and revoke. First-account setup closes once an account exists. Set up and validate a backup before inviting users.
Accounts and 2FA
Sign in with the email and password for your Drive account. When your account requires two-factor authentication, enter a current authenticator code or one of your recovery codes in the second-factor field.
Set up an authenticator
- Open Account → Settings → Two-factor authentication.
- Enter the required account confirmation and choose Set up 2FA.
- Scan the QR code in your authenticator, or enter the setup secret there.
- Enter the authenticator’s current code and choose Enable 2FA.
- Save the recovery codes in protected storage so you can sign in if you lose the authenticator.
Settings also provides password changes, recovery-code controls, and session management. Review your recent sign-in activity and revoke a session you no longer use. If you need a password-reset link, contact your server administrator for the one-time recovery link.
Server administrators create accounts in the administration account controls. Workspace access and item sharing are granted separately, so an account can receive the access appropriate to its work.
Workspaces and invitations
A workspace holds a folder tree and its files. Choose a workspace to browse its contents. Your administrator can create workspaces; workspace owners manage their membership and lifecycle in Workspace settings.
| Role | Use it for |
|---|---|
| Can view / Viewer | Browse, preview, and download workspace files. |
| Can edit / Editor | Read access plus creating and changing files and folders. |
| Owner | Manage workspace membership, settings, ownership, and lifecycle. |
Invite a collaborator
- As a workspace owner, open Workspace settings → Members.
- Enter the collaborator’s account email, choose Can view, Can edit, or Owner, and select the access duration when available.
- Choose Invite, then Copy link. Deliver that one-time link to the intended person through your chosen private communication channel.
- The recipient signs in to the Drive account matching the invited email, opens the link, chooses Check sign-in if needed, and accepts.
The pending invitation list offers New link and Cancel. A new link replaces the invitation link you previously delivered. Use the member list to review current access. Workspace owners can also rename, archive, unarchive, transfer ownership, or leave through the available workspace controls.
For access to just one file or folder, use item sharing. Workspace membership supplies workspace browsing and WebDAV access.
Upload, find, and organize
Add files and folders
Open the destination workspace and folder. Choose Upload → Upload files or Upload folder, or drop files into the browser’s file area. Use New → New folder to create a folder. Drive supports resumable uploads up to 2 GiB; keep the upload view open and follow its progress until completion.
Find the file you need
Use Search files to search names and indexed extracted text. Browse Recent, use stars and labels to organize recurring work, and apply the available filters in My files or Recent. Shared views show the items granted by their owners.
Work with a selection
Select a file or folder to open its details and actions. Use Preview, Download, Copy, or Move to trash. Download folder exports a folder as a ZIP. Selecting several items exposes batch actions, including ZIP download, move, trash, and restore where available.
Open Rename, move & history to change the name, parent folder, labels, or metadata, then choose Save details. Use Move to… to select a destination. When a destination name is occupied, choose the offered collision resolution and check the resulting name and location.
For a text edit, select the file, choose Open for editing, edit its content, and select Save local edit. Drive records content changes in revision history and preserves a conflict copy when competing changes need reconciliation.
Preview formats
Select a file and choose Preview to open its viewer. Drive chooses the viewer from the extension, ignoring letter case.
| Format | Extensions | View |
|---|---|---|
| Images | .png .jpg .jpeg .gif .webp .bmp .ico | Image |
.pdf | Browser PDF viewer | |
| Video | .mp4 .webm .mov | Video player |
| Audio | .mp3 .wav .ogg | Audio player |
| Markdown | .md .markdown | Formatted Markdown using Drive’s supported subset |
| Text, data, and code | .txt .log .rtf .csv .tsv .json .xml .yaml .yml .toml .js .ts .py .rs .go .sh .css | Plain text; RTF source and CSV/TSV data appear as text |
Text and Markdown previews accept UTF-8 files up to 256 KiB (262,144 bytes). Image display and audio/video playback use your browser’s decoders and depend on its support for the file’s encoding. PDF display uses the browser’s PDF viewer.
Inspector previews and content search
| Preview | Formats and size |
|---|---|
| Image thumbnail | .gif .jpg .jpeg .png .webp, up to 512 × 512 pixels. |
| Text excerpt | First 240 extracted characters from UTF-8 text, .docx .xlsx .pptx, and .odt .ods .odp. |
Generated previews process files up to 32 MiB, with additional image-decoding and Office-extraction limits. Drive indexes bounded extracted text from UTF-8 files and these Office packages. Text-bearing PDFs have best-effort extracted-text search.
Use Office excerpts to find and inspect documents, then download and open the original in its application for page layout, formulas, comments, embedded media, and editing. Legacy .doc .xls .ppt files are available for download; use Open XML or OpenDocument packages for extracted-text previews and search.
Guest media previews
Guest links preview images with .bmp .gif .jpeg .jpg .png .webp and video with .mov .mp4 .webm. Guest video playback uses the recipient’s browser and its supported codecs.
Revisions and comments
Select a file, expand Rename, move & history, and choose Load revisions. Select the revision you want to inspect.
- Download saves the selected historical body for inspection.
- Restore revision restores that body as a new current version while keeping existing history.
- Pin protects a revision from ordinary retention pruning; Unpin makes it eligible again.
- Delete removes the chosen historical revision when permitted. Prune by policy applies the configured history policy.
Use the file’s Comments area to add a comment, reply to a discussion, or resolve it through the available controls. Invitations, shares, comments, uploads to drops, and sync conflicts can appear in the notification inbox. Mark notifications read as you finish reviewing them.
Trash and recovery
Move to trash removes an item from ordinary browsing while keeping it available for recovery. Open Trash, select the item, and choose Restore to recover it. Batch restore is available for multiple selected items.
Delete permanently and Empty trash permanently remove selected recoverable items after the required confirmation. Review the selection before confirming. Workspace retention can also clear old trashed files and unpinned revisions according to the administrator’s policy.
A desktop deletion is reviewed separately in the sync app. Follow the desktop review flow to choose whether to restore or propagate that deletion. Use revision history for an earlier file body and a server backup for server-wide content recovery.
Guest links
Use a guest link to let someone view a file or folder without a Drive account. Guest links provide read-only access; use a separate upload drop to receive files.
- Select the file or folder, open its sharing controls, and expand Link settings.
- Choose an optional password, a message for guests, a maximum visit count, and whether to Allow guests to download.
- Choose the expiry: one hour, 24 hours, seven days, 30 days, or Never.
- Select Create guest link, copy the returned link, and deliver it to your intended recipients. Deliver a password separately when you use one.
Recipients open the link, enter its password when requested, browse the allowed item, and use the available preview or download action. The guest viewer supports the image and video formats listed in Preview formats.
Use the link-management controls to review activity, change the supported settings, or revoke a link. Revocation ends future access through that link. A downloaded copy remains with the recipient.
Receive guest uploads
An upload drop gives guests a dedicated place to submit files to a workspace. Open the authorized Drops controls for that workspace, enter a drop name and optional password, and choose Create drop.
Select Copy drop link and deliver the link to contributors. Guests open it, complete its access prompt, choose their files, and wait for upload completion. A drop link supplies upload access to its destination.
In the drop-management list, select a drop to change its supported name, password, expiry, or limits. Review received files in the workspace and revoke the drop when collection is complete. Drive can notify the recipient when a drop receives an upload.
Install the desktop app
Use the signed desktop package from the official Drive release and the matching platform guide. Get your server’s HTTPS address and an existing account before pairing.
| Platform | Install and verify |
|---|---|
| Windows x86-64 | Verify the installer checksum and its valid Digital Signature against the published manifest’s publisher identity. Run the NSIS installer, then launch ShellX Drive Desktop. Setup can install Microsoft WebView2 when needed. |
| macOS arm64 | Verify the package’s Developer ID signature, notarization, staple, and Gatekeeper acceptance. Install it and launch ShellX Drive Desktop from Applications. |
| Linux x86-64: Debian package or AppImage | Verify the matching updater signature with the authenticated Drive public key and check the checksum. Install the Debian package with your package manager, or keep the AppImage in a stable user-owned folder, make it executable, and run it. |
Linux needs GTK 3, WebKitGTK 4.1, an Ayatana or compatible AppIndicator tray runtime, and an ordinary-user graphical session with Secret Service. Use a compatible package manager for the Debian package or working AppImage mounting support for the AppImage. Run the desktop as your ordinary user.
Pair and add Drive roots
Drive connects one signed-in server and account to one chosen local base folder. Up to 100 selected roots can sync below that folder, with separate safe child folders for owned and shared locations.
- Prepare a dedicated, empty, ordinary local folder for Drive, separate from other sync tools’ folders.
- In the desktop app, enter the server’s HTTPS origin and select Validate. Complete first-administrator setup in the browser first if the server requests it.
- Sign in with your account. Enter a TOTP or recovery code when requested.
- Browse the available owned and shared roots, using the additional pages when needed, and select the first root.
- Use the native Choose folder dialog to select the empty local base and confirm Connect and start syncing.
- Wait for Synced, then check a small file from each side. A Viewer root supports checking downloads; an editable root supports both directions.
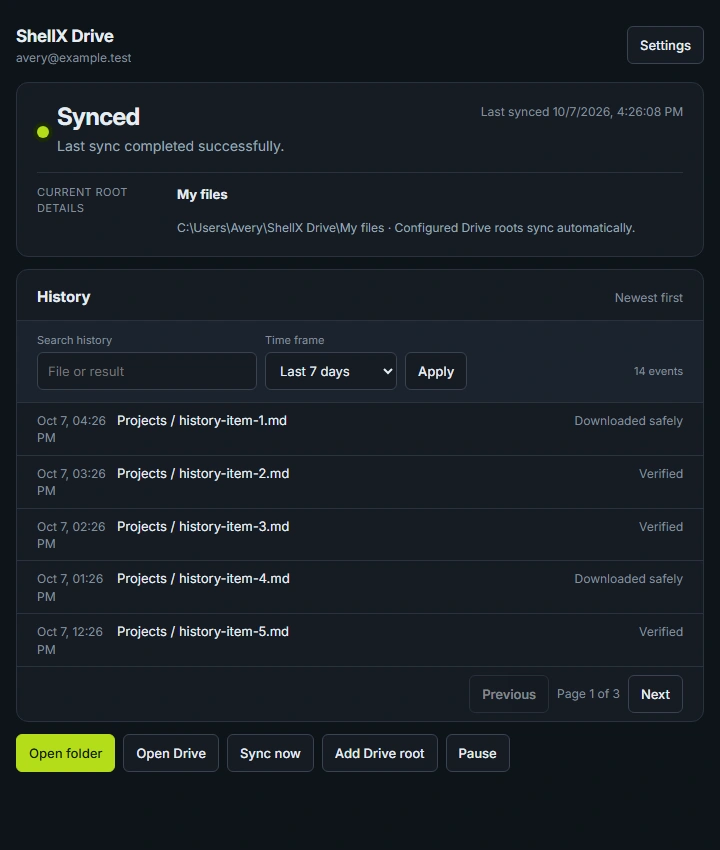
Use Add Drive root to select another accessible root. Newly granted roots become available for selection; add each one explicitly. Current status details shows the chosen root’s summary while every configured root continues syncing.
Keep independent regular files in managed roots. If a symbolic link, reparse point, hard link, or ambiguous path needs review, inspect it and replace it with an ordinary copied file when you want its content synced.
Sync, reconnect, and review
Work inside the managed child folders. Drive compares and syncs configured roots automatically while it is running. Use Open folder to reach your local files, Sync now to request a pass, and Pause or Resume to control transfers. The Launch at login setting starts Drive with your desktop session.
| Status | What to do |
|---|---|
| Synced | The last complete comparison converged. Use this state to check completion of a requested pass. |
| Syncing | A sync pass is active. Wait for its terminal status. |
| Paused | Choose Resume when you are ready for automatic transfers. |
| Offline | Continue local work, restore connectivity, and choose Retry now. |
| Needs reconnect | Use Reconnect to sign in again. Pairing and local files are retained. |
| Needs review | Open the pending decisions and choose the action for the named file or folder. |
| Error | Follow the displayed recovery action and retry when its requirement is resolved. |
Resolve a conflict or deletion
Competing edits preserve both bodies and enter Needs review. Use Open folder to inspect the named files and conflict copy, reconcile the intended content or safely rename it, and choose Recheck review. Deletion reviews offer explicit actions according to the item’s state and your current access.
| Action | Result |
|---|---|
| Move to Drive trash | Apply a local file deletion to Drive’s recoverable trash. |
| Restore local copy | Recover the local copy from Drive. |
| Move local copy to recovery | Remove the copy from the managed location while keeping it in local recovery. |
| Restore to Drive | Recover the Drive item from the retained local copy. |
Read the confirmation for the named item and its affected descendants before applying a deletion review. Folder reviews keep their own available recovery choices.
Use Recheck review after inspecting or safely renaming an item to refresh its pending decision. If the decision belongs to another configured root, open Settings and select that root’s status details. Each review stays attached to its own managed files.
While offline, keep your edits inside the managed root. Reconnect and let Drive compare them before editing the same paths on another device. Shared Viewer roots download only; local changes stay available for review. Revoked roots stop remote syncing and retain their local bytes.
Disconnect a device
Before changing server or account, open Settings and choose Disconnect this PC. Drive first stops active synchronization safely and retires the saved connection. A confirmed disconnect removes the saved credential and connection metadata while keeping your local synced files.
Keep the server reachable during retirement. If the app reports that retirement is unconfirmed, use its retry action and keep the saved state in place until it completes.
Drive on your phone
Open your Drive HTTPS address in the phone’s browser. Use the responsive file view, upload controls, camera upload where offered, and the selected-file actions for opening, sharing, and comments. You can install the web app through a browser that supports PWA installation.
Mark for mobile download records which files you intend to download. The web app’s saved file list is metadata-only. Use the explicit download action to save file bodies to your device and manage those downloaded files through the device’s normal storage controls.
WebDAV
Use a client that supports HTTPS WebDAV with bearer-token authentication. Your workspace endpoint is https://drive.example.com/dav/{workspace_id}; folders and files use nested paths below it.
- Identify the workspace you can access and its ID using the authenticated API.
- Configure the endpoint and a protected user session or account-wide delegated credential in your client.
- Browse and download with workspace read access. Create folders, upload, rename, move, copy, or trash items with workspace write access.
- Keep move and copy destinations inside the same workspace.
Drive supports OPTIONS, PROPFIND, GET, PUT, MKCOL, DELETE, MOVE, COPY, and exclusive write LOCK/UNLOCK on existing resources. WebDAV deletion follows Drive’s normal trash path.
Workspace membership supplies WebDAV access. An item-only grant can be used through that item’s sharing and desktop-root flows.
Back up and restore a server
Server administrators manage whole-server recovery in Server administration → Backups. A backup contains the content and catalog for every workspace. Use revisions or trash for an individual file recovery.
- Choose Create server backup and wait for its job to succeed.
- Select the completed generation and choose Check selected backup. Wait for validation to succeed.
- Choose Download a copy and store the complete
.sxdbackuparchive in protected off-host storage. - Use Automatic backups to enable an hourly, daily, or weekly schedule and choose how many completed archives remain on the server.
Creation, validation, and restore run as jobs. Queued and Running are pending; check the completed result before relying on the archive or recovery. Scheduled generations are followed by integrity validation.
Restore content
Validate the selected archive, arrange a maintenance window, and choose Restore whole server with the required confirmation. Ordinary writes pause during restore. Wait for the restore job to succeed, then check readiness and the recovered workspace content.
Restore recovers archived content and catalog data while preserving the target server’s current account and access authority. On a fresh target, create its administrator and explicitly grant workspace access after restoring. Follow the operations guide for importing the archive and performing an off-host restore drill.
Protect every backup copy
Backups are unencrypted, operator-readable restore material, including server data and stored file bodies. Protect them with your storage controls, such as encrypted disks and an encrypted off-host destination. Keep a verified off-host copy and exercise its restore procedure.
Desktop and server updates
Update the desktop
The desktop app checks the official signed update manifest after launch. Open Settings → Desktop app, choose Review update, check the target version and publisher guidance, then choose Download and install to approve that exact update.
The app reports download progress and verifies the signed package before handing it to the platform installer. On Windows, macOS, and Linux, use the authenticated platform package and verification requirements described in the installation guides.
If you enable remote agent control for an enrolled desktop, the authenticated account owner or an account-wide delegated agent can authorize an exact checked, signed update on that device. Grant this access to operators you trust to make that installation choice.
Update the server
Server administrators review the server release notice and package links. First create a backup and wait for success. Authenticate and stage the new release through the maintained package procedure, stop the active service at the documented step, and run the verified installer from its protected stage. The upgrade retains the configured data root and public origin.
After the installer restarts the service, check its active state, running version, /health, and /ready, then check ordinary file access. Keep the pre-upgrade backup available through verification.
Use Drive with an agent
Drive’s authenticated HTTP API supports automation of files, workspaces, sharing, sync, and authorized administration. Give your agent the public ShellX Drive skill and its endpoint reference.
Choose a folder-scoped View or Edit grant for work inside one shared subtree. Use an account-wide delegation when an agent needs your ordinary account-wide operations. Manage account-wide credentials in Account → Settings → Account-wide AI agents; keep the one-time token in protected credential storage and rotate or revoke it through its controls.
Example requests to your agent
- “Find the project notes in my accessible workspaces and download the selected file.”
- “Upload these files into the Reports folder, then verify their names and contents.”
- “Give this enabled account Viewer access to the selected folder until the agreed expiry, then verify the grant.”
- “List my selected desktop’s pending sync reviews so I can choose how to resolve them.”
Authorize the intended actions and have the agent check each returned result through an allowed metadata, content, activity, or settings readback. Administrator operations require current administrator authority; account passwords, MFA, and action-specific confirmations remain part of their corresponding flows.
Help and reference guides
For help, include the installed app or server version, platform, status or error wording, timestamp with time zone, server hostname, and clear reproduction steps. Keep passwords, authenticator and recovery codes, session values, credential-store contents, and share links in their protected account flows.
Contact your server administrator for account access, password recovery, grants, server maintenance, and backups. Use the repository’s issue templates for ordinary product bugs and feature requests. For a vulnerability report, follow the repository’s security policy.
- Source and issue templates
- First server installation
- Support, runtime compatibility, and preview formats
- Server operations and recovery
- Server configuration
- Security reporting policy
This manual describes the observed published release, v0.1.11. Downloads resolve through the official Drive download routes.